Wednesday, May 31, 2006

Oven Roasted Corn on the Cob


I recently watched How to Boil Water on the food network with Tyler Florence where he roasted corn on the cob. It looked so easy and seemed like it would taste great so I tried it.

Here is the recipe:

Oven Roasted Corn on the Cob
Recipe courtesy Tyler Florence

4 ears fresh corn

Preheat oven to 350 degrees F. Place corn husks directly on the oven rack and roast for 30 minutes or until corn is soft. Peel down the husks and use as a handle when eating.

My rating is just 3 stars because after 30 minutes my corn wasn't soft, so I left it in for another 10 minutes and it still seemed a little hard to me. The flavor was good though, because by roasting the corn, it brings out the sweetness.

I will probably try it again and hope for the best.

Pasta Frittata


This is a great dish to use up leftovers. If you have any kind of leftover pasta, veggies, even potatoes, you can whip up a quick and easy weeknight dinner in a snap.

Everyweek I make roasted veggies and I always have extra, so I am constantly trying to think of ways to use them in new dishes.

The first dish I made with these veggies was a pasta dish using bow ties... My Pasta Primavera (look 3 posts down for photo and complete recipe)

I just sauted a little shallot and garlic in some extra virgin olive oil and mixed in the leftover veggies. Then I added a little extra Italian seasoning, fresh parsley and grated parmigiano cheese. I cooked the bow ties and added them to the veggie mixture with a little pasta water. Simple and satisfying.

Now I had leftover Pasta Primavera.

So I decided to create yet another new dish. My Pasta Frittata. It's this easy.

I beat up 6 eggs, added a little milk, salt and pepper. Then I put my leftover pasta and veggies in a large oven safe saute pan with some olive oil added the eggs along with some cubed chedder cheese and mixed it until loosely set on the top and lighty browned on the bottom. Then I put it under the broiler for a few minutes until set on top. I let it sit for about 5 minutes and I had another new meal from 2 nights of leftovers!

Tuesday, May 23, 2006

ITALIAN PASTA DIET -- IT REALLY WORKS !!


I recently got this in my email and thought it was kind of cute, so I thought I would share it:

1. You walka pasta da bakery.

2. You walka
pasta da candy store.

3. You walka
pasta da Ice Cream shop.

4. You walka
pasta da table and you walk pasta da fridge.

You will lose weight!


For those of you who watch what you eat,
here's the final word on nutrition and health.

It's a relief to know the truth after all those conflicting nutritional studies.

1. The Japanese eat very little fat and suffer fewer heart attacks than Americans.

2. The Mexicans eat a lot of fat and suffer fewer heart attacks than Americans.

3. The Chinese drink very little red wine and suffer fewer heart attacks than Americans.

4. The Italians drink a lot of red wine and suffer fewer heart attacks than Americans.

5. The Germans drink a lot of beers and eat lots of sausages and fats and suffer fewer heart attacks than Americans.

CONCLUSION

Eat and drink what you like.

Speaking English is apparently what kills you.

"I Love Food" Haiku


Ate too much for lunch.
Ate too much for dinner too.
Treadmill here I come.


Now it's your turn:
Leave me a comment with your Food Haiku-It can be about anything food related!

Remember- - the first line five syllables - the second line seven syllables - the third line five syllables

Ready, Set, Haiku!

Pasta Primavera!

It's spring. Or so they say, even though the weather seems more like fall. Nevertheless, I'm celebrating spring with Pasta Primavera(means spring in Italian).

This is one of the easiest dishes to make and so versatile. You can use pretty much any vegetables you like and any pasta too.

I used fresh broccoli, summer squash, green beans, carrots, portabella mushrooms, black & green olives, shallot and celery.

First I prepared all the veggies-(washed, peeled and cut-up). Then I put them in a pie plate with a tiny bit of water and microwaved them on high for about 8-9 minutes depending on the amount of veggies and your microwave. (You can skip this step if you like your veggies crisp).

Next, I drained the water, coated them with some extra virgin olive oil, garlic powder, italian seasoning, salt and pepper and roasted them in a 400 degree oven for about 25 minutes. This step is important because it caramelizes them a bit which gives this dish great flavor.

Then I chopped a small shallot, mixed it with some e.v.olive oil and microwaved on low for about 2 minutes. Next, I just mixed all the veggies, shallot and cooked farfale (bow tie pasta), and a small amount of reserved pasta water together. Sprinkled on some grated parmigiano, romano cheese and fresh chopped parsely. That's it.

For a little more heartiness, I broiled a chicken cutlet and sliced it over the pasta.

Try it, you'll like it!

Monday, May 22, 2006

The King Of Cookies-Volume #2


The last time I made these Oatmeal Raisin cookies (right) and Chocolate Chip cookies (below), I froze some of the uncooked
cookie dough.
Well, this weekend I dug it out of the freezer and baked them. Yum. They were sooooooooo gooooood. I just can't stress it enough.


I'll give a link you the recipe. Here it is: Click here for the best chewy cookies

Caution Note: Check for doneness after 9 minutes.

Friday, May 19, 2006

"Cheaters" Stuffed Artichokes


I have never made Stuffed Articokes in my life. Why? I'm not really sure. I guess it just seems like alot of work for a side dish. Although that has never stopped me before. So I don't know why I have never made them. I just haven't.

But I do make something very close which is much easier. I got this recipe from a friend of mine a few years ago and I have been making it ever since. In fact, it's one of my favorite's.

This is not really a recipe as much as just an assembling of ingredients. Even the measurements are rough.

All you need is:
One can of Articoke Hearts (I get the quartered ones, because they are not the easiest to cut). Drained and rinsed in cold water to get rid of some of the canny flavor and sodium.
A handful of Black and Green Olives-cut in half
Two Cloves of Minced Garlic
A handful of chopped Fresh Parsley
A couple of Tablespoons of grated Parmigiano or Romano Cheese
A couple of Tablespoons of Extra Virgin Olive Oil
About 1/3 cup of Seasoned Breadcrumbs (give or take)

Preheat oven to 375 degree. Combine all the ingredients except the breadcrumbs and place in a small oven safe caserole dish. Sprinkle with the breadcrumbs and drizzle the top with a little more olive oil. Bake for about 20-25 minutes until top is golden brown.

Let me know what you think of it!

Wednesday, May 17, 2006

Hello...My Name Is Annie and I AM a Chocoholic.


I'm back on the wagon again. Last week was brutal for me. I was under a lot of stress with work and I gave into temptation way too many times. The culprit. Chocolate, of course.

A had a box of Russel Stover Truffles that were given to me for Easter that I finally got around to opening. Actually, I had been putting off opening the box for fear it would thrust me into a chocolate eating frenzy.

It seems my fears were substantiated. I spent every night after work trying to tell myself to eat healthy and resist the urge to "binge"(there I said it).

It always started out good. I would get home from work make something really healthy and delicious for dinner and eat a very hefty portion(so I would be to full for candy).

Yeah right! It only made me want it even more. I would open the box and tell myself "I'm only going to have a couple". Well a couple turned into around 8, ok maybe even 10 or 12. I don't know. Who was counting?

Anyways, I felt so sick afterwards, not to mention guilty. It's a terrible feeling, but when I was stuffing those dark, creamy, luscious, little bits of heaven into my mouth all I could think of was how wonderful the next one was going to taste.

The sad part is, some of them weren't even that great now that I think of it. But that would just add fuel to the fire. Because then I would think...That one wasn't that great let me try another. I can't let that one be the last flavor in mouth.

Well, I'm glad the box is gone.

Tonight I had an Apricot Square(My Mom makes them-they are one of my favs)and 5 Hershey Kisses for dessert.

Hey, that's not bad.
Considering.


Question of the day: What triggers your binge?

"I Love Food" Haiku

White spinach pizza
Hot cheese stretching from the slice
Green teeth...Where's the floss?


Now it's your turn:
Leave me a comment with your Food Haiku

Remember- - the first line five syllables - the second line seven syllables - the third line five syllables

Ready, Set, Haiku!

Tuesday, May 16, 2006

Bambola's Lemon Meringue Pie


My dear friend Bambola made this fantastic Lemon Meringue Pie and brought it over for Mother's Day. It was a nice palate cleanser after the Tiramisu. We are a multi-dessert family.


She made the graham cracker crust from scratch. It was delish- the lemon custard infused the graham crust and made it even more irresistable!

Annie's Tiramisu...Only The Best For MOM!

My mom is not very picky, but she knows what she likes and what she doesn't like. Although she would be satisfied with anything I made her, I decided to make a tiramisu for her for Mother's Day.

I figured what better day to give my Mom a "Pick Me UP" which is the Italian translation of Tiramisu.

If you have never tried it before, you need to. It is just a fabulous dessert, which is actually pretty easy to make. It requires no baking. Just a little stirring over the stove top and assembly.
I've created a recipe which combines a few ideas from Giada DI Laurentiis and few ideas from Italian Cooking for Dummies. And as a result..I think my recipe is better! So lets get started.


Annie's Tiramisu
One 8 ounce container of Mascarpone Cheese
3 or 4 tablespoons Sugar
1 cup cold espresso (I made instant, you can find instant espresso at any Italian market)
28 Savoiardi (Crisp Lady Finger Cookies, Also found at any Italian market)
1 recipe Zabalione (Custard filling) See below
Unsweetened Cocoa powder to sift

Mix the mascarpone cheese to soften just until smooth and then fold in the zabaglione. Cover and refrigerate.'

Line a loaf pan with plasic wrap, allowing the wrap to extend over the sides.(great tip by Giada DI Laurentiis). In a wide, flat bowl, whisk the espresso with the sugar.

Dip 7 cookies into the espresso one at a time, and arrange in a single layer over the bottom of the prepared pan. Spoon one third of the mascarpone mixture over the cookies to cover. Repeat the dipping and layering of the cookies and mascarpone mixture 2 more times. Dip the remaining 7 cookies in the espresso and arrange on the top.
Press down lightly (the top layer will extend above the pan sides). Cover with the plastic wrap and refrigerate at least 2 hours or upto one day.


Unwrap the plastic and invert the tiramisu onto a platter and remove the plastic. Sift cocoa on the top and serve.

Zabalione
7 Egg Yolks
7 Tablespoons of Sugar
3/4 cup of Amaretto

1. Fill a saucepan 1/3 full with water and bring to a simmer over medium heat.
2. In a large bowl, beat together egg yolks and sugar. Whisk in the Amaretto. Set the bowl over the simmering water, taking care that it doesn't touch the water. Whisk for 5-8 minutes, removing the bowl from the heat for a moment if it heats too quickly. The mixture should be thick and foamy.

We actually had some leftover and I didn't want to eat it again in the same week because it is so rich, so I decided to try freezing some. I don't know if it will still be as good, but I can't wait until the day I take it out. I'll let you know how it worded out.

Cookies...Ooohh I Did It Again!!

Prunes and Dates and Apricots...Oh My!

I went crazy with my earlier blogged prune recipe. This time instead of making all prune cookies, I also made date and apricot cookies.


Since the dough is formed into 3 separate logs, I figured why not?

I had a can of Solo brand date filling which I used in one batch.

I made my own prune filling this time by pureeing a box of prunes with a little water, corn syrup, sugar, and lemon zest.

I did the same with a box of dried apricots and I added a layer of raspsberry jam on the top of the apricot filling just for fun.
They were scrumptious.
I have always loved the flavor of these three dried fruits and I even like figs too!
People joke with me all the time, saying only old people eat that stuff. Well I'm not old but I am wise. Because hey, these things are all good for you. Give them a chance, you might just be surprised.

The Perfect Pork Chop


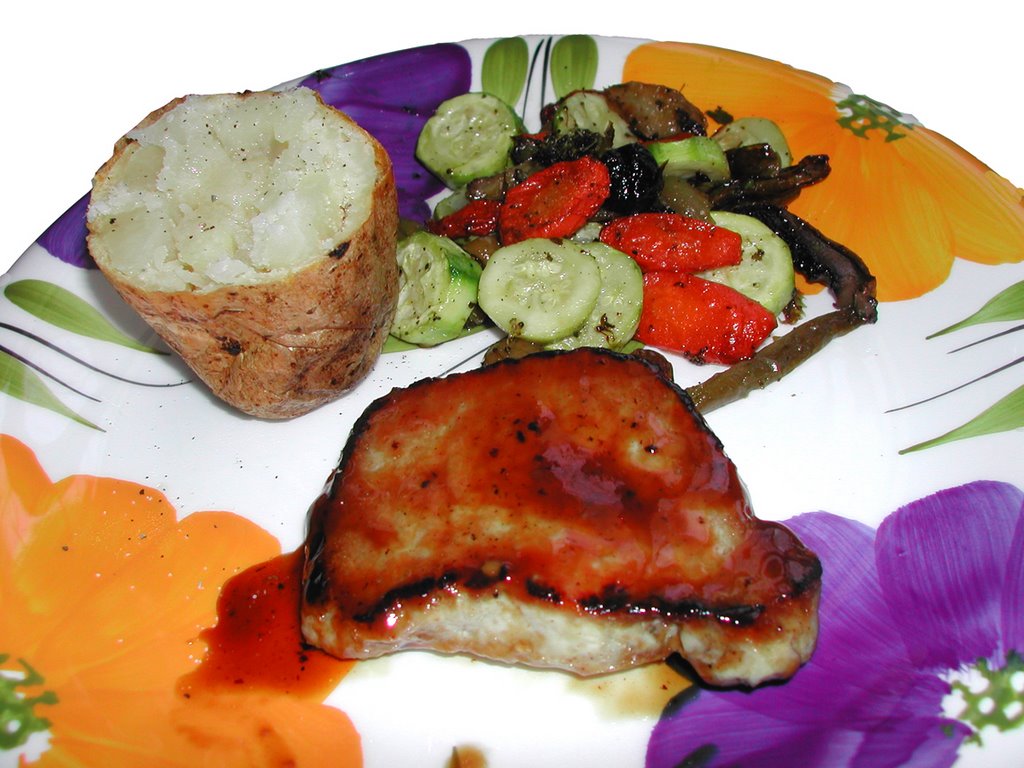
I have never made a perfect pork chop. Until now. The recipe I used came from the March issue of Cooks Illustrated Magazine. And now it's yours FREE!!!
Ahh the advantages of visiting MIXED SALAD ANNIE!

Basically, most people including myself overcook pork chops. Cooks Illustrated came up with a technique that "sort of" prevents this from happening. I say "sort of" because you could still overcook them if your not careful... I almost did. (I'm still trying to master a new electric stove).

The trick is to quickly sear one side, then finish over low heat, gently simmering them in a glaze.

You start by using boneless pork chops,5 to 7 ounch each about 1/2 to 3/4 inch thick. Preferrably 3/4 inch, because the thinner the chop, the more chance you will over cook them.


The Glaze:
1/2 cup distilled white vinegar or cider vinegar
1/3 cup light brown sugar
1/3 cup apple cider or apple juice (I didn't have any on hand, so I used
chicken broth with good results)
2 tablespoons dijon mustard
1 tablespoon soy sauce
pinch cayenne

Chops:
4 boneless center-cut or loin pork chops,5 to 7 ounch each about
1/2 to 3/4 inch thick
1 tablespoon vegetable oil

1. Combine all glaze ingredients in medium bowl; mix thoroughly and set aside. Trim chops and slash through fat and silver skin with sharp knife, making 2 cuts about 2 inches apart,in each chop(do not cut into meat of chops). Pat chops dry with paper towels and season with salt and pepper.

2. Heat oil in heavy bottomed 12" skillet over medium-high heat until smoking. Add pork to skillet and cook until well browned, 4 to 6 minutes. (I did 4 minutes). Turn chops and cook 1 minute longer; transfer chops to plate and pour off any oil in skillet. (Check internal temperature of thinner chops; see note below*). Return chops to the skillet, browned side up, and add glaze mixture; cook until center of chops registers 140 degrees on instant-read thermometer, 5 to 8 minutes (I did 5 minutes).
Remove skillet from heat; transfer chops to clean platter, tent with foil, and let rest 5 minutes.

3. When chops have rested, add any accumulated juices to skillet and set over medium heat. Simmer, whisking constantly, until glaze is thick and color of dark caramel (heatproof spatula should leave wide trail when dragged through glaze), 2 to 6 minutes. Return chops to skillet; turn to coat both sides with glaze. Transfer chops back to platter, browned side up, and spread remaining glaze over top. Serve immediately.

*NOTE: If the chops are already at the 140-degree mark, remove them from the skillet and allow them to rest, tented with foil, for 5 minutes, then add the platter juices and glaze ingredients to the skillet and proceed with step 3. If your chops are closer to 1 inch thick, you may need to increase the simmering time in step 2.

Ok I have a confession. Although I said I made the perfect pork chop, I sort of lied. My chops registered 160-degrees on the instant read thermometer. But for me this is perfect.
Most of the chops I have made in my life were more like shoe leather than meat.

So in closing, my chops were slightly overcooked but remained somewhat juicy and for the most part tender. I liked the glaze. It was tangy and a little sweet, but not overly sweet. I would definately try this recipe again.

Let me know if you try the recipe and how it works out for you.

Wednesday, May 10, 2006

"I Love Food" Haiku


Decadent, Creamy
Rich, Velvety Smooth Chocolate-
I Crave It Daily.


Now it's your turn:
Leave me a comment with your Food Haiku

Remember- - the first line five syllables - the second line seven syllables - the third line five syllables

Ready, Set, Haiku!


image(istockphotos)

I Am Italian Food.


Here's a fun survey my friend Jen sent me to find out:
"WHAT KIND OF FOOD ARE YOU?".

My results are...
You Are Italian Food

Comforting yet overwhelming.
People love you, but sometimes you're just too much.

CLICK ON THE LINK BELOW to take the survey and LEAVE ME A COMMENT With Your Results.
I'M DYING TO KNOW...

Tuesday, May 09, 2006

Light Chicken Parmigiana


This looks fried, does'nt it? It's not. And it tastes sort of fried too. The secret, you ask? Ok, the breadcrumbs are sauted in a tablespoon of olive oil (which we all know by now is good for us).

I can't take the credit for this ingenious idea. It is a recipe from Cook's Illustrated new Light Cookbook. I have'nt ordered it yet but it is on my wish list. I got the recipe in the Providence Journal's food section one week.
They suggest using Panko breadcrumbs because they stay crispier.

I went a step further to make them even healthier. I used whole wheat Panko breadcrumbs. The idea is to saute the breadcrumbs before breading the chicken cutlets. This way, much less oil is used and/or absorbed into the chicken.

You batter the cutlet just like the traditional recipe: coat in flour, then in egg, then in the sauted and cooled breadcrumbs mixed with parmigiano reggiano and I suggest garlic powder,italian seasoning and fresh parsley.

Bake on a rack(Spray the rack and cutlets with olive oil, I use mazola pure) on a cookie sheet in a 475 degree oven for about 10 to 15 minutes depending on the thickness of your cutlets.

Add some mariara sauce, grated mozzarella cheese, grated parmigian reggiano cheese and pop back in the oven for 5 minutes to melt the cheeses.

They were pretty good. They even impressed my mom who has fried her share of chicken cutlets. Give it a try. Let me know how it worked out for you.

Monday, May 08, 2006

Twice Baked Potato


No need for a recipe here. Just some helpful tips.

For a crispy skin- coat the scrubbed potatoes with olive oil.
Bake for around an hour in a 400-425 degree oven.
Cool, cut open and scoop out the potato into a bowl.

Add whatever you like or have on hand.

In my case, I added a little non-fat milk,low-fat whipped cream cheese, a little butter, a bit of parmigiano cheese, salt, pepper, fresh italian parsley and mashed it all up together. Stuffed the potato with the filling and baked again at 350 for about 20 minutes. They were very good, although I was a little surprised with all those tasty ingredients, it was a little lacking in flavor until I added a little more salt.

If you have alot of potatos on hand, I suggest making a few, wrapping the extras in foil, place in a freezer bag and freeze them for future use.

I love it when I have no idea what I am going to eat and I look in the freezer and find something I had previosly frozen. It's like finding money in the couch only tastier!

Friday, May 05, 2006

Green Bean Almondine!


This is my favorite vegetable side dish.

Nothing could be finer and it's so simple to prepare. Cook the beans to your desired tenderness and add a bit of light tasting oil (I use Canola), toasted almond slices or slivers, and the secret ingredient, a 1/4 teaspoon of pure almond extract.

What's your favorite? Leave me a comment...

Wednesday, May 03, 2006

Citris Biscotti

I adapted this recipe from Giada DE Laurentiis who hosts Everyday Italian on the Food Network.
In Giada's recipe she uses a combination of lemon zest and orange zest, as well as Pistachios. I used orange zest only, omitted the Pistachios and added semi-sweet chocolate chips instead. I also adjusted the baking time (I baked them 10-15 minutes less).


The second batch needed some dressing up, so I covered them with dark chocolate and sprinkled on some fresh orange zest. Yum!

If you'd like the recipe just leave me a comment.

Tuesday, May 02, 2006

"I Love Food" Haiku


I Love Ice Cream Cones
Chocolate Chip Is My First Choice
On A Waffle Cone

Share Your "I Love Food" Haiku...


Photo: Cold Stone Creamery

Twice Baked Eggplant Parmigiana


I love Eggplant Parm, but I don't eat it that often because it is very rich and filling. So I decided to create a recipe that would be lighter in taste and on the waistline. I kept it traditional by keeping the breading but I lightened it up by baking it instead of frying it.

The Recipe:
2 Medium Eggplants
Salt & Pepper
1 Teaspoon Garlic Powder
1 Cup Seasoned Breadcrumbs
2 Eggs Beaten
1/2 Cup Flour
2 Cups Marinara Sauce
Freshly grated Parmigiano Reggiano Cheese (I would'nt skimp here because the flavor it worth the extra money and effort)
Handful of Shredded Mozzarella Cheese
Olive Oil Spray (I use Mazola Pure)

Peel the eggplants and slice them lengthwise into 1/2 inch thick slices. Salt the slices and let sit for about 15 minutes to release moisture and bitterness. Rinse under cold water and pat dry.

Line up 3 pie plates or platters and fill one with flour, one with the beaten eggs and the last with the breadcrumbs.
Season the flour with salt, pepper and garlic powder. Dust the each eggplant slice with the flour, dip in the egg mixture and then in the breadcrumbs. Spray 2 baking sheets with olive oil and place the slices in a single layer.

Bake in a 400 degree oven for about 20 minutes until the slices are golden brown.


Spray a square pyrex pan with a little oil and spread a layer of marinara sauce on the bottom. Place about 3 slices of eggplant down and add a layer of sauce and sprinkle with about a tablespoon of parimigiano cheese. Continue layering with eggplant, sauce and cheese. Sprinkle the top layer with the mozzarella cheese and more parmigiano. Bake in a 350 degree oven for about 30 minutes. Let sit for about 10 minutes and enjoy!

Mom's Pineapple Upside Cake


This cake is a always a hit and so simple to make.

Follow the directions on your favorite boxed yellow cake to prepare the batter.

For the Topping You'll need:
2 round cake pans
About 1/2 cup Walnuts
About 1/3 cup Brown Sugar
A can of Pineapple Rings
Maraschino Cherries
2 Tablespoons of Butter or Smart Balance Spread

Butter or spray the cake pans. Spread the Brown Sugar on the bottom of the pans and then sprinkle on the nuts. Place the Pineapple rings on top in a single layer (as many as will fit comfortably). Place a cherry in the middle of each Pineapple. Now add the batter and cook as directed on the cake mix box.

When cooled, just place a serving plate on top of the cake and flip it over. Viola! Now you have 2 perfectly pretty cakes- one for you and one for someone who has great taste. Or as Mom would say "Someone who deserves it"!

Monday, May 01, 2006

Eat Your Vegetables!

My Weekly Roasted Veggie Medley.

Every weekend I go grocery shopping and buy a bunch of fresh vegetables. When I get home I try to take the time to wash them and prepare a couple of different side dishes to use for the upcoming week. It makes it a lot easier to eat healthly during a hectic work week if the veggies are already prepped.

This is one of my fav's. It's a combination of broccoli, carrots, green beans, celery, black olives, green olives, portabella mushrooms and herbs. I wash and cut everything, put it in a glass dish with a tiny bit of water, and microwave on high for about 8 minutes.

They are actually ready to eat just like this, but I drain them and put them on a foil lined baking sheet, coat them with olive oil, salt and pepper, garlic powder, italian seasoning and place them in a 400 degree oven for about 25-35 minutes. This sort of caramelizes them and brings out all of the sweet flavors in the veggies.

Now I have fresh roasted veggies to eat when I'm to busy to make them Monday thru Wednesday. Try it and let me know how it works out for you!