Thursday, August 23, 2007

My Melt-In-Your-Mouth Blueberry Cake

If You Like Blueberry Muffins, You'll Love This Blueberry Cake!

It was my mom's birthday recently and I was searching for the perfect cake recipe. I wanted her cake to be special and I wanted it to reflect some of her favorite flavors. One thing I knew for sure is that she loves blueberry muffins and orange juice. So I went on a mission searching online for a blueberry cake recipe with orange essence.

In my search I found out some interesting information on proportions and measurements when making a homemade cake. Here is the website. I think anyone who has ever baked from scratch knows that baking is more of a science than cooking. Everything has to be measured out perfectly and in the correct measuring cups for dry or wet ingredients. Weighing the ingredients is actually the best way to go.

The correct proportions make a huge difference in whether or not the cake is moist or dry, if the cake is light and airy or dense and heavy and if it rises correctly. I found this information extremely helpful because I do like to tinker with ingredients in recipes to customize them to my taste.

The recipe I found for this cake was called Melt In Your Mouth Blueberry Cake. I did make some changes to the recipe with the info that I learned. I also doubled the recipe in order to make a 2 layer-frosted birthday cake. For the frosting I decided to go with cream cheese and flavored it with orange. And it turned out great. In case you're wondering it did melt in your mouth!

My Melt-In-Your-Mouth 2 Layer Blueberry Cake
with Orange Cream Cheese Frosting

4 eggs, separated
2 cups sugar
1/2 cup margarine, softened
1/2 cup canola/virgin olive oil blend, or one or the other
1/2 teaspoon salt
2 teaspoons vanilla
3 cups flour, sifted
1 1/2 tablespoons flour, to coat berries
2 teaspoon baking powder
1 cup milk
2 1/2 cups fresh blueberries

Preheat oven to 350º.

Beat egg whites until stiff. Beat in 1/2 cup of sugar. In another bowl, cream margarine; add salt, vanilla, and remaining sugar gradually. Add egg yolks and beat until creamy. Mix in oil. Sift flour with baking powder. Add alternately to creamed mixture with milk. Fold in beaten egg whites. Coat the blueberries with 1 1/2 tablespoons of flour and then fold into mixture.
Turn into 2 ~ 9" x 2'' high pans. (If you only have 9" x 1 1/2" pans, just fill them 3/4 full and pour the extra batter into a small cake pan or baking dish and enjoy it for yourself).
Bake in 350º oven for 35 minutes turning half way through baking. Cool on racks. Frost with orange cream cheese frosting.

Store in refrigerator. May be frozen.

Orange Cream Cheese Frosting

1 8 0z. package of 1/3 less fat cream cheese
4 tablespoons butter or margerine, softened
3 cups powdered sugar (or more depending on consistency)
1 tablespoon orange juice (or more depending on consistency)
Zest of one orange

Beat cream cheese and butter or margarine in bowl to blend. Beat in powdered sugar alternately in two to three additions with the orange juice and vanilla extract. Add in the orange peel. Chill until firm but spreadable, about 30 minutes, if necessary.

Sit, Lay Down, Roll Over...

Homemade Doggie Biscuits

This is Nico. He is a YorkiePoo. He is really a great dog, but does have some issues. He is pretty much neurotic. Cute as a button, and very smart though.
And picky, picky, picky.

Lately he has an issue with his bum. Not to gross anyone out too much, but he has a little pain when he does #2 and lets out a cry. I brought him to the vet and he said it is most likely an allergy, gave me some antihistamine with cortizone and told me to add pumpkin to his food (so as to ease the process of doing #2).
Luckily he loves the pumpkin. A few weeks ago, I found homemade pumpkin dog cookies at my local farmers market. HE LOVED THEM. To the point of doing tricks that he hates to do, like rolling over. Asking Nico to roll over is like trying to give a sick child cough medicine. He runs just at the command. But just the sight of one of these cookies and he is rolling all over the place.
So I went back to the farmers market and unfortunately the lady that was selling them wasn't there. So I figured, how hard could it be to make dog cookies??? I looked online and found a pumpkin doggie biscotti recipe. He should love it, right? Well, he will eat them but he's not rolling over at the mere sight of them. These are more like a pumpkin toast and hers were more of a cookie texture. I don't understand what the problem is, I tasted them and they are actually pretty darn good. I guess he prefers the cookies. Spoiled brat!

NB:This recipe is for doggie treats. It should not constitute the primary diet of your dog, and is not suitable for cats.

Mom's Famous Pumpkin Biscotti
- From Better Food for Dogs

Makes about 1 lb of Biscotti
- Preheat oven to 350°F
- Nonstick baking sheets
1 cup canned pumpkin puree
(not pie filling)
1/4 cup each liquid honey and water
2 tbsp canola oil
1 large egg 1
1 tsp vanilla
4 cups all-purpose flour
1 tsp ground cinnamon
1/4 tsp baking powder
1/4 tsp baking soda

1. In a large bowl, whisk together pumpkin puree, honey, water, oil, egg and vanilla. Stir in flour, cinnamon, baking powder and baking soda until well incorporated.
2. In the bowl and using hands, knead until dough holds together. Transfer to lightly floured surface. Divide dough into 2 equal pieces. Shape each piece into a log. Flatten the logs to make about 4 inches wide.
3. With a fork, poke holes all over the surface of the logs. Place about 4 inches (10 cm) apart on baking sheet.
4. Bake in preheated oven for 35 to 40 minutes or until firm. Place pan on a rack and let cool for 30 minutes. Reduce oven temperature to 300°F.
5. With a sharp knife, cut each log into 1/4-inch thick slices. Place, cut side down, about 1/2 inch apart on baking sheets. Bake for 30 minutes longer or until hard. Transfer cookies to a rack and let cool completely. Store in a tightly sealed container for up to 30 days.

Mini Carrot Muffins

Not Bad For Cake Mix !

Yet another lazy baking experience. I had this Betty Crocker Carrot Cake mix in my cabinet for a while and needed to use it before it expired. (This always seems to be the case whenever I buy boxed mixes). I always end up making things from scratch and then end up with a cabinet full of mixes that I bought on sale!

There was a recipe for The Ultimate Carrot Cake on the box that I used to make these muffins. I decided to make mini muffins only because I just bought this mini muffin pan and wanted to give it a try.

I made these muffins low-fat by substituting applesauce for the oil. The only thing I didn't like about using the applesauce is that it makes the texture of the muffins a little wet, especially on the tops. I decided to remedy this by making frosting! Yeah I know, I said they were low-fat, but what the heck, you take away something and you have to add a little something. Everything equals out in the end.

I also used only the egg whites, but I added coconut oil to replace the yolks. Like I said everything equals out.

I like to freeze muffins for future eating and these were no exception. I filled a storage container with unfrosted muffins for whenever I want to indulge!

The Ultimate Carrot Cake Muffins

1 box Betty Crocker® SuperMoist® carrot cake mix
1/2 cup orange juice or water
1/2 cup applesauce
1 can (8 oz) crushed pineapple in juice, undrained
1 teaspoon grated orange peel
1 teaspoon vanilla
4 egg whites
1/2 cup chopped walnuts
1/2 cup shredded unsweetened coconut
2 tablespoons coconut oil (or canola oil if you don’t have coconut oil)

Heat oven to 350°F (325°F for dark or nonstick pans). Spray a mini muffin pan with baking spray. In large bowl, beat cake mix, orange juice, coconut oil, applesauce, pineapple, orange peel, vanilla and eggs on low speed 30 seconds. Beat on medium speed 2 minutes. Stir in nuts and coconut. Pour into muffin pan, filling to the top.

Bake 15-20 minutes, or until toothpick inserted in center comes out clean. Cool 10 minutes. Run knife around sides to loosen muffins; remove from pan to cooling racks. Cool completely, about 1 hour.

Spread each muffin with about 1 tablespoon frosting. Store in refrigerator.
Orange Cream Cheese Frosting

1 to 2 teaspoons orange peel, if desired
8 oz package of low-fat cream cheese, softened to room temperature
1 1/2 - 2 cups powdered sugar (add more or less depending on consistency)
2 tablespoons coconut oil, butter or margarine, softened
1 tablespoon orange juice or milk
1/2 teaspoon vanilla extract

Beat cream cheese and oil (or butter/margarine) in bowl to blend. Beat in powdered sugar alternately in two to three additions with the orange juice and vanilla extract. Add in the orange peel. Chill until firm but spreadable, about 30 minutes, if necessary.

The Ultimate Brownie Cake

Ooey Gooey Goodness!

This was made from a boxed brownie mix-Betty Crocker Supreme Brownie Mix, Chocolate Chunk with mini Hershey's Kisses. I dressed it up a bit by adding a teaspoon of pure almond extract and cooked it in a 6 inch spring cake pan. This size pan made the brownie cake extra thick and as a result, extra gooey inside. I guess it remains a little under cooked in the center, but that's how most people like it.

I topped it with a decadent chocolate frosting. What can I say? I was in chocolate heaven!

Triple Chocolate Brownie Cake


1 Box Betty Crocker Supreme Brownie Mix, Chocolate ChunkBrownie Mix
1 teaspoon pure almond extract
Follow directions on the box, adding the extract as well. Bake at 325 degrees in a 6 inch spring cake pan for about an hour and 5 minutes. Check with a wooden tooth pick. When the tooth pick comes out almost clean (just a few wet crumbs on it), it's done. Cool completely and frost if desired.

Decadent Chocolate Frosting

1/4 cup coconut oil (or butter or margarine)
2/3 cup cocoa (I used Drost)
1 1/2 cups powdered sugar
2-4 tablespoons milk (Plus more if needed)
1 teaspoon vanilla extract

Melt coconut oil. Stir in cocoa. Alternately add powdered sugar and milk, stirring until it is of spreading consistency. Add small amount additional milk, if needed. Stir in vanilla.

Turkey Bolognese Sauce over Polenta Squares

Delicious!!!

I really enjoyed this dish and I think you will too. It is a very loose interpretation of bolognese sauce, since traditionally bolognese is made with meat and uses very little tomato. It also has milk or cream in it, which I didn't use. I just thought it sounded better to call it turkey bolognese sauce than turkey tomato sauce. Don't you think??

This is really easy to make, so don't let the photo deceive you. It is just a little time consuming, due to the chopping, but it is so worth it. The polenta is also easy to make since I used the quick cooking one. If you have never tried polenta, please give it a chance. It is sort of like grits. It definately needs to have a sauce or ragu over it to give it flavor. I made a marsala chicken ragu over polenta another time and it was also really good. It's a nice change of pace if your a little tired of pasta.


Turkey Bolognese Sauce over Polenta Squares

Start by making the

Polenta Squares


2 cups boiling water
1 tablespoon butter, at room temperature
1 teaspoon salt, plus more for seasoning
1/2 cup quick-cooking polenta

Bring the water, 1 tablespoon butter, and 1/2 teaspoon salt to a boil in a heavy medium saucepan. Gradually whisk in the polenta. Reduce the heat to medium-low. Stir constantly until the polenta thickens, about 5 minutes. Pour the polenta into a greased 9 by 9-inch baking pan, spreading so that it is 1/3-inch thick. Cover and let stand at room temperature until set, about 15 minutes.

Turkey Bolognese Sauce
Extra virgin olive oil
2 cloves garlic, minced
1 large shallot or small onion, chopped fine
1/2 red bell pepper, chopped fine, optional (I had some so I used it, but you could also use chopped carrot, celery and/or green pepper )
3/4 lb. ground turkey (I used 93% lean)
1 Tbls. tomato paste, optional (I had some in the freezer so I used it)
1/4 tsp. dried oregano
Pinch of red pepper flakes
1 - 28 oz. can Italian whole tomatoes, hard pieces discarded and crushed by hand or blender (I used Muir Glen Organic and pureed them slightly with my hand held blender)
1/2 can water
1o fresh basil leaves
1/2 tsp. salt
1/4 tsp. pepper
1/4 cup chopped fresh basil leaves
1/4 freshly grated Parmigiano Reggiano

Add about 3 tablespoons olive oil, garlic, red bell pepper and shallot to a cold large skillet and cook on medium low until the veggies soften and become fragrant. Immediately add the ground turkey, turn the heat up to medium high and stir until almost cooked through. Push the turkey to the sides of the skillet and make an open spot in the middle of the pan. Add the tomato paste, stir and cook until it begins to caramelize. Add the oregano and red pepper flakes. Stir and cook for about a minute. Add the can of tomatoes and 1/2 can full of water. Stir to combine all ingredients. Add the bay leave, whole basil leaves and salt and pepper. Bring to a boil, lower heat and cover partially. Let simmer for about half an hour on low heat. Remove the whole basil leaves, if desired, and add the chopped basil. Taste to see if more salt and pepper is needed.

To Assemble:
Cut the polenta into 6-8 squares. Arrange the polenta squares on a platter. Spoon the warm Turkey Bolonese Sauce atop the polenta. Drizzle with extra virgin olive oil, if desired. Sprinkle with Parmigiano cheese and serve immediately.

Wednesday, August 22, 2007

Bachelor or not, this is a great salad...

Caramelized Fennel Salad ~
Giada DeLaurentiis thinks this is the perfect salad for single guys!

Personally, I don't think most Bachelors could be bothered caramelizing anything to put on top of a salad. I understand her point being that it is an easy, yet elegant dish that anyone could prepare with minimal effort. And by the way it was easy and quite elegant, but most importantly delicious!

I made a few changes to her Caramelized Pancetta and Fennel Salad recipe. Firstly, I used Canadian bacon in place of the pancetta. I don't buy a lot of pancetta, or bacon for that matter, but I do try to have Canadian bacon on hand for dishes that call for some kind of pork fat product. I like to use the Canadian bacon because it is a lot lower in fat and I feel better about eating it. For this recipe, I cut mine in small pieces before roasting them, but I wouldn't do that the next time I make it. The smaller pieces got a little too hard and chewy, although the flavor was great.

Secondly, I cut down the sugar because I didn't want it to be sweet. And it wasn't, it was just enough to help caramelize everything. And we all know that caramelizing is a good thing. It's where all the flavor comes from. YUM!

Caramelized Fennel Salad
Adapted from Giada DiLaurentiis

1 bulb fennel, halved and cut into 1/2-inch wedges
5 slices Canadian bacon, cut in thirds
2 cloves garlic, minced
2 teaspoons brown sugar
1 tablespoon extra-virgin olive oil
1/4 teaspoon salt
1/8 teaspoon freshly ground black pepper
5 ounces (about 6 to 7 cups) Romaine lettuce, or mixed salad greens
Red Wine Vinaigrette, recipe follows
Preheat the oven to 400 degrees F. Line a baking sheet with parchment paper.

In a medium bowl, toss together fennel, Canadian bacon, garlic, brown sugar, olive oil, salt, and pepper. Place the ingredients on the baking sheet in a single layer. Cook until the Canadian bacon is crisp and the fennel is caramelized, about 20-25 minutes. Remove from the oven and let cool for 5 minutes.

In a large bowl, place the salad greens, Canadian bacon, and caramelized fennel. Toss the salad with the Red Wine Vinaigrette and serve immediately.

Red Wine Vinaigrette:
2 tablespoon red wine vinegar
1 tablespoon lemon juice
1/2 teaspoon honey
1/2 teaspoon salt
1/8 teaspoon freshly ground black pepper
1/4 cup extra-virgin olive oil

Mix the vinegar, lemon juice, honey, salt, and pepper in a blender. With the machine running gradually blend in the oil. Season the vinaigrette, to taste, with more salt and pepper, if desired.


Thursday, August 16, 2007

Do You Know The Muffin Man?

I Think He Retired... So I Made My Own!

A few weeks ago, I was on The Cookbook Junkies blog and she had made the most delicious looking orange berry muffins. She got the recipe from Dorie (I can't remember her blog name) but I've been there before and enjoyed it.

Anyway, I decided to make a version of that recipe and the low-fat blueberry muffin recipe from America's Test Kitchen that I usually make. Only this time I used 5 tablespoons of virgin coconut oil instead of 4 tablespoons of butter and I added more blueberries. The turned out really good.

Orange Blueberry Muffins

1 1/2 cup blueberries*, washed and dried
2 cups plus 1 Tbl. all-purpose flour
2 teaspoons baking powder
1/4 teaspoon baking soda
1/2 teaspoon salt
2 egg whites (from large eggs)
3/4 cup packed light brown sugar
1 Tbls. canola oil
5 Tbls. virgin coconut oil, melted and cooled
3/4 cup nonfat buttermilk
Grated zest and juice of 1 small to medium orange
1 teaspoon vanilla extract

*Double wrap the blueberries in freezer bags and freeze for at least an hour or overnight, as frozen ones won't all sink in the batter. Don't take them out until the batter is made and oven is preheated.
Adjust oven rack to middle position and heat oven to 375 degrees. Spray 12-cup muffin tin with nonstick cooking spray.

Whisk 2 cups flour, baking powder, baking soda and salt together in a large bowl.

In a medium bowl, run the sugar and orange zest together with your fingertips until the sugar is moist and the fragrance of orange is strong. Whisk egg whites and brown sugar together until thoroughly combined. Gradually whisk in melted coconut oil and canola oil, then buttermilk, orange juice and vanilla until well blended.

Fold into dry mixture with rubber spatula (a few streaks of flour should remain).
Remove blueberries from freezer and toss with remaining tablespoon flour in small bowl. Gently fold blueberries into batter, being careful not to break berries.
Distribute batter in muffin tin and bake until light golden brown and toothpick or skewer inserted into center of muffin comes out clean, 25 minutes, rotating pan halfway through baking.

Tuesday, August 14, 2007

Italian Pesto Turkey Burgers

If you want to satisfy a burger craving, this is the answer!

Even though my Italian pesto turkey burgers are actually healthy, you'd hardly even notice. These quarter pounders offer a lighter alternative to the traditional beef patty, but truly pack a punch to your appetite. And even though they are lean, they are so juicy and flavorful.

To make this recipe even quicker and easier, you can use bottled pesto or do what I do ~ Make a batch of pesto without adding the cheese and freeze a portion of it in an ice cube tray. When the pesto is frozen, store it in a plastic freezer bag. When you're ready to use it, just take out a couple of cubes, let them defrost and mix in some grated parmigiano cheese. It also works great for quick pasta dishes, but in this case, add a little pasta water in addition to the cheese, to the pesto before mixing in the pasta. Give it a try!

Italian Pesto Turkey Burgers


1 pound lean ground turkey (I used dark meat, which is about 93% lean)
2 1/2 tablespoons basil pesto, plus more for topping on bun
1 garlic clove, minced
1 egg white, beaten
1/4 cup grated Parmigiano Regiano cheese, or parmesan in a pinch
1/4 cup bread crumbs, (I used Italian flavored panko breadcrumbs)
1/8 teaspoon salt
1/8 teaspoon pepper
4 light hamburger buns, toasted lightly on grill

Preheat grill on medium-high heat. (I used a stove top grill and heated it over medium heat)
  1. Mix together pesto, egg white, garlic, parmigiano cheese, salt, pepper and breadcrumbs in a medium bowl. Add the ground turkey and mix until evenly blended. (Do not over work the meat or it will be tough when cooked)
  2. Form into 4 equal size patties.
  3. Grill pesto burgers for about 4-5 minutes per side or until no longer pink in the center. 180 degrees on an instant read thermometer. (Mine were cooked in about 8 minutes total.)
  4. Place each burger atop a toasted bun, top with a slice of fresh tomato and spread additional pesto on the bun tops.

Monday, August 13, 2007

Squash Slaw

A great way to use up extra zucchini and summer squash

I knew I would be making turkey burgers (I'll post them next) this weekend and I was trying to think of a side dish to go with them. Since I had a couple of zucchini and summer squash in the fridge, I thought about making a slaw with them. I had an idea of how I would make it but wanted to browse the internet for ideas. I found a recipe online that sounded really close to what I was going to do and used it as a guide for the measurements.

My revised recipe:

Squash Slaw


2 yellow summer squash
2 zucchini
1 sweet red pepper
1 celery stalk
1 small garlic clove, grated fine (or pressed/minced)
3 tablespoons canola oil
2 tablespoons raw apple cider vinegar
1 tablespoon mayonnaise
1/2 teaspoon sugar
½ teaspoon "It's a Dilly" by McCormick, or just use dill weed
½ teaspoon garlic powder
¼ teaspoon onion powder
¼ teaspoon pepper

Shred summer squash and zucchini. Finely chop celery and thinly julienne red pepper. Place in a strainer over a bowl for about 10 minutes. Press down on mixture to release excess juice.
Combine all ingredients and stir. Cover and refrigerate before serving to allow flavors to blend. Serve with slotted spoon.

Tuesday, August 07, 2007

Frittata Grilled Cheese Sandwich

This was a first for me...

But it won't be the last! I make the same kind of frittata every week and usually I just throw in leftover veggies, some fresh herbs and cheese. When I was making this frittata, somehow I forgot the cheese. I can't image how I could forget cheese, I mean cheese just makes everything taste better.

Well anyway, I figured why not put the cheese on top and then I thought about a grilled cheese. It just all made sense...So I buttered some bread, threw on some swiss cheese, layered on the frittata, added sliced tomato and cooked each side in a skillet until golden brown. It was a thing of joy!

Fresh Corn Salad

Quick & Easy Summer Meal For One

The best way to enjoy the tastes of summer is in salads. Fresh corn on the cob is delicious anyway you eat it, but throw in some cannellini beans for protein, fresh chopped garden tomatoes, kalamata and green olives for zest, fresh lime juice for zing, fresh garden herbs and now you've got a healthy and delicious meal for one.

It's so easy...
Just boil 1 corn the cob for 10 minutes in water with a little salt and sugar covering the corn half way. Drain and set aside. When cool, cut off the kernels and place in a medium bowl.

Add
2 tablespoons of drained and rinsed cannellini beans
1/2 garden tomato (chopped)
3 sliced kalamata olives
3 sliced green olives
1 tablespoon fresh lime juice
2 tablespoons fresh assorted fresh herbs (parsley, basil, thyme, etc.)
1 tablespoon extra virgin olive oil.

Add a dash of sea salt and freshly ground black pepper, mix and your done!

Monday, August 06, 2007

Fresh Pesto

Basil Right From The Garden...

My friend Jen's Garden that is. Since she had an abundance of basil, she gave me a big bag full.
I love the smell of fresh basil.

In my opinion, the best way to use fresh basil is to make pesto. It can be used in so many ways, but I decided to make a pasta dish with it.

It was simple, just ditallini pasta, chopped tomato, sliced black and green olives, steamed broccoli florets, steamed sliced carrots and steamed chopped green beans. Cook the pasta, drain, but add a little pasta water to the pesto to make a quick sauce, then toss all ingredients together. Delicious!!

Here is a pesto recipe from Giada DeLaurentiis with some revisions that I made.

Pesto

2 c. packed fresh basil leaves (I used 4 cups)
1/4 cup fresh parsley (This was my addition-I like the combination, plus the parsley helps the pesto retain it's vibrant green color)
1/4 cup toasted pine nuts (light roast nuts in small skillet until lightly toasted and fragrant)
1 garlic clove
1/2 tsp. salt, plus more to taste
1/4 tsp. freshly ground pepper, plus more to taste
about 2/3 cup extra virgin olive oil
1/2 cup Parmesan cheese (For the best flavor, use freshly grated Parmigiano Regiano)

In blender, (I used a food processor) pulse basil, nuts, garlic, salt, and pepper until finely chopped. Gradually add enough oil to form a smooth, thick consistency (while blender is running). Transfer to bowl and add cheese*. Season with more salt and pepper as necessary. Cover and refrigerate until ready to use.

*Note: If you don't plan on using the whole batch right away, put some aside and do not add the cheese. Spoon the pesto without the cheese into an ice cube try and freeze. (The cheese tends to break down in the freezer). When frozen, transfer the pesto cubes to a freezer bag. When you are ready to use them, just thaw them in the refrigerator and then add the cheese.

Friday, August 03, 2007

Dulse

This is a delicacy in Eastern Canada.
It is Canadian Seaweed...aka Dulse.

I think it stinks, both literally and figuratively.

My coworker "Bert" is from Canada and mentioned that he and his whole family love this stuff. He says you can get it at any convenience store in Canada. Last week his sister in-law came to visit and she brought some with her. He was bragging about how great it was to the whole staff. We all couldn't understand what the big deal was.

So low and behold, yesterday morning he presented a ziplock bag which he had stashed in his pocket. Within it contained the beloved "Dulse". I was the first to experience it being the unofficial "office cook".

I had never seen Bert so excited. It was like a child was let loose in the Willie Wonker's Chocolate Factory. He slowly pulled out a piece of the crimson stained seaweed and revealed it to me.

My first instinct was to smell it of course. I took one whiff and nearly lost my all natural grain cereal and soy milk breakfast. It was repulsive. It smelled like he just picked it up off the dirty filth ridden beach shore. Of course, he assured me that during the harvesting, it goes through a cleaning process and was perfectly safe to eat. I had another opinion.

Because I was so reluctant to try it, he immediately tore off a piece and popped it his mouth, chewed it for about 10 seconds and swallowed it down. I noticed when he was tearing it, that it was really "elasticy". I guess that's why he didn't chew it for long.

I'm still laughing just thinking about his demonstration. He really thought it would entice me to try a piece. I had to pass.

Question: Bert would like to know if anyone else has tried dulse and enjoyed it?

Thursday, August 02, 2007

Fresh Fruit

This was supposed to be a Napoleon dessert...

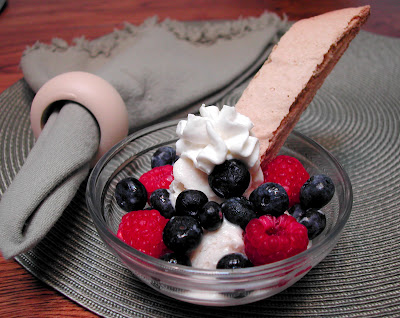
But I burned the layers-oops! I had a recipe using phyllo dough to create layers of crisp phyllo, yogurt, cream, blueberries and raspberries. Each layer of phyllo had butter flavored cooking spray and cinnamon sugar sprinkled on the top. I over baked them and they tasted burned and bitter. So I went to plan B.

I had some Vanilla Cinnamon Biscotti in the freezer that I thawed out. I used maple flavored low-fat organic yogurt (Wallaby brand~ it is sooo good!), light whipped cream and amaretto liquor.
I think it turned out great. Yeah for plan B!

Plan B Yogurt Surprise

1/3 cup maple flavored yogurt (or your favorite flavor store brand)
1/3 cup light whipped cream
2/3 cup each of blueberries and raspberries
1 tablespoon amaretto liquor
4 vanilla cinnamon biscotti (or your favorite flavor store brand)

In a small bowl, mix the amaretto into the yogurt and fold in the whipped cream. Place mixture in the freezer for about an hour. Place one scoop of the yogurt mixture into a dessert dish and top with berries. Place the biscotti along the side and add another tablespoon of whipped cream if desired.
Serves 4 (or less if your like me)